How To Make A Bow With A Bandana - Simple Steps For Anyone
There is, you know, a pretty cool trick for making something stylish out of a simple piece of cloth. It's about taking a common item, like a bandana, and turning it into a neat little accent. Maybe you want to add a bit of flair to your hair, or perhaps dress up a gift package, or even just give a plain bag a bit of personality. This way of doing things, it just gives you a fun and easy project to try out.
You don't, in a way, need any special skills or tools to get this done. Just a regular bandana and a few moments of your time are all that's required. It's one of those little creative acts that feels good to do, and the result is something you can use right away. People often think you need a lot of fancy stuff to make something pretty, but this shows you can do a lot with very little, actually.
By the time we finish up here, you'll have a clear idea of how to make a bow with a bandana that looks quite nice. You'll be able to whip one up whenever you feel like it, adding a personal touch to so many different things. It's a simple skill, yet it opens up a whole lot of possibilities for adding a little bit of charm here and there.
Table of Contents
- What You Need to Make a Bow with a Bandana?
- Getting Your Bandana Ready for a Bow
- Folding the Fabric - How to Make a Bow with a Bandana
- Creating the First Loop of Your Bandana Bow
- Making the Second Side of Your Bow
- Tying the Center Knot for Your Bandana Bow
- Shaping and Adjusting Your Finished Bow
- Where Can You Use Your New Bandana Bow?
What You Need to Make a Bow with a Bandana?
So, before you begin, it's pretty helpful to know what items you'll want to have on hand. The list is, honestly, quite short and simple. You won't need to go out and buy anything special, which is a big part of what makes this little project so appealing. It's more or less about using things you might already have sitting around your home, you know?
The main item, of course, is a bandana. The size of your bandana can actually change the look of your finished bow a little bit. A standard square bandana, typically around 22 by 22 inches, works really well for a good-sized bow. If you use a smaller one, you'll get a daintier bow, and a bigger one will give you something more substantial. The color and pattern are totally up to you, which is kind of fun, as it lets you match it to whatever you're planning to put it on.
Beyond the bandana itself, you pretty much don't need anything else. No scissors, no glue, no thread, or needles. This is, in a way, what makes it such a quick and easy thing to do. It’s just you and the fabric, which is quite nice. Having a flat surface to work on can be helpful, though not strictly necessary. A table or even your lap will do just fine, really.
- French Crop Receding Hairline
- Niece Yellie And Her Uncle
- She Aint No Diva
- Cat Sitting Gay
- Banana Chasing Strawberry
You might, in some respects, want to have a mirror nearby if you're planning to wear the bow in your hair. This lets you see how it looks as you go along and helps you get it just right. But again, it's not a must-have. The idea here is to keep it super simple, so anyone can give it a try without feeling like they need to prepare a whole lot of stuff beforehand, you know?
Getting Your Bandana Ready for a Bow
Okay, so the very first thing you'll want to do is get your bandana laid out. You want it to be as flat and smooth as possible. Any wrinkles or creases might make the bow look a little less tidy in the end. So, take a moment to unfold it completely and spread it out on a flat space, like a table or even the floor. This step is pretty important for making a bow with a bandana that looks neat.
If your bandana has been folded up for a while, it might have some stubborn lines in it. You don't necessarily need to iron it, but if you want a really crisp-looking bow, a quick pass with an iron can help a lot. Just make sure it's completely flat before you move on to the next part. This really helps with getting those clean folds later on, which is, you know, a key part of making a good bow.
Once it's laid out, take a look at its shape. Most bandanas are square, which is perfect for this project. If yours is a different shape, like a rectangle, you might still be able to make a bow, but the exact steps for folding it might vary just a little bit. For this guide, we're assuming a standard square bandana, which is what most people have, really.
Make sure the side you want to be visible on the outside of the bow is facing down. This means the "wrong" side, or the side you don't want to show, should be facing up towards you. This is a small detail, but it makes a difference in the final look of your bow. It's just a little thing that helps make your how to make a bow with a bandana project turn out well.
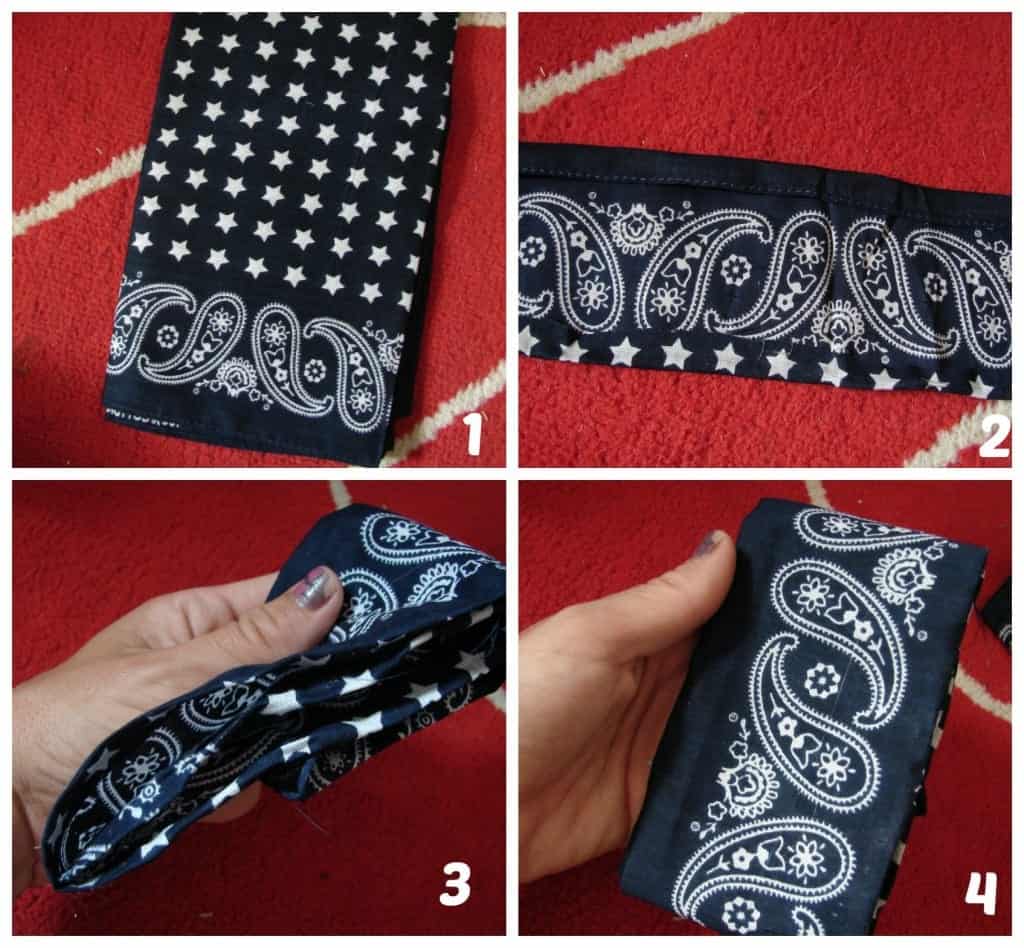
Folding the Fabric - How to Make a Bow with a Bandana
Now that your bandana is laid out flat, it's time to start folding it into a strip. This is, basically, how you get the main body of your bow. You're going to fold it diagonally first. Take one corner and bring it over to the opposite corner, making a triangle shape. Try to line up the edges as precisely as you can, so you get a nice, even fold. This is pretty much the first big step in creating your bow.
Once you have that triangle, you'll start folding it from the longest edge, the one that used to be the diagonal of your square. You're going to roll or fold it upwards, starting from that long edge, towards the point of the triangle. The idea is to create a long, narrow strip of fabric. The width of this strip will decide how wide your bow's "arms" are, so keep that in mind.
You want to keep the width of this strip fairly consistent as you fold. Try to make it about two to three inches wide, or maybe a bit wider if you want a bigger, bolder bow. Just keep folding or rolling until you reach the tip of the triangle. You should end up with a long, thin piece of fabric, kind of like a ribbon, but made from your bandana. This is, you know, a pretty important part of how to make a bow with a bandana.
Some people like to iron these folds as they go to make them extra crisp, but it's really not necessary for a good outcome. Just try to keep the folds neat with your hands. The smoother the strip, the better your bow will look. This prepares the bandana perfectly for the next steps, where we start to give it its bow shape, which is, in a way, the fun part.
Creating the First Loop of Your Bandana Bow
With your long, narrow strip of bandana ready, it's time to start forming the actual bow shape. This is where it really begins to look like something. You'll take one end of your folded bandana strip and bring it around to form a loop. Think of it like making one side of a bunny ear when you're tying shoelaces, that sort of thing. This will be one of the two main loops of your bow.
The size of this loop will, naturally, determine how big one side of your finished bow is. If you want a smaller bow, make a smaller loop. For a larger, more dramatic bow, make a bigger loop. Hold this loop in place with your thumb and forefinger, right where the fabric crosses over itself. This is, you know, a pretty key spot to keep a hold of.
Make sure the loop is relatively even and smooth. You don't want any twists or kinks in the fabric at this point. Just a nice, rounded shape. The loose end of the bandana should be pointing away from the loop you've just made. This is, in some respects, the foundation for the whole bow, so getting this first loop right is a good idea. It sets the stage for the rest of the steps in how to make a bow with a bandana.
Hold it firmly, because you'll be working with the other end of the bandana strip next. This steady grip helps keep your first loop from unraveling as you prepare the second one. It's a simple action, but it's quite important for keeping the shape you want. You're basically creating one half of the bow, and it should look pretty much like a rounded ear.
Making the Second Side of Your Bow
Now that you have your first loop held securely, it's time to create the second one. This is, you know, what will complete the classic bow shape. Take the remaining long end of your bandana strip and bring it around to form another loop, just like you did with the first one. You'll want to try and make this second loop roughly the same size as your first. This helps ensure your bow looks balanced and neat.
As you form this second loop, you'll bring it over the top of the first loop, right where you're holding it in the center. It's almost like you're making an "X" shape with the two loops. The fabric should cross in the middle, and that crossing point is where your bow will eventually cinch together. This is, actually, where the magic starts to happen for how to make a bow with a bandana.
Hold both loops in place at that central crossing point. You'll have two loops sticking out, one on each side, and two loose ends hanging down, or pointing in opposite directions. It might feel a little awkward at first, holding everything in place, but just keep a gentle yet firm grip. The goal is to keep those loops from flopping around too much as you get ready for the next step.
Check the symmetry of your loops. Are they roughly the same size? Do they look similar in shape? If one is much bigger or smaller than the other, you can gently adjust them now before you tighten anything. Getting them pretty even at this stage really makes a difference in the final look of your bow. It's all about setting things up nicely for the next part, you know?
Tying the Center Knot for Your Bandana Bow
With both loops in place, crossing over each other in the middle, it's time to secure everything. This is, in a way, the most important part for how to make a bow with a bandana, as it turns your loops into a stable bow. You're going to take one of the loose ends that's hanging down and thread it through the center hole created by your crossed loops. It's pretty much like making the knot of a shoelace.
So, pick one of the loose ends, it doesn't really matter which one. Push it up and through the opening that formed where the two loops crossed. You'll want to pull it all the way through, so it comes out on the other side. This action will start to pull the center of your bow together, creating that pinched look that bows are known for. It's a bit like pulling a string to gather fabric, in a sense.
Once you've pulled that end through, you'll have one loose end coming out of the top of your bow, and the other loose end still hanging down. Now, take the loose end that's still hanging and bring it around the back of the bow, then thread it through the same center hole, but from the opposite direction. This creates a simple knot right in the middle of your bow. This is, honestly, the core of making the bow stay put.
Gently pull both loose ends to tighten the knot. Don't pull too hard at first, just enough to start seeing the bow shape emerge more clearly. You want it snug, but not so tight that it distorts the loops too much. This central knot is what holds your bandana bow together, making it a proper, usable accessory. It's a pretty satisfying moment when you see it take shape.
Shaping and Adjusting Your Finished Bow
After you've tied that center knot, your bandana bow is almost done, but it probably needs a little bit of finessing. This is, you know, where you make it look just right. Gently pull on the loops and the loose ends to adjust the overall shape. You can make the loops puffier or flatter, depending on the look you're going for. It's all about making it pleasing to your eye.
If one loop looks a bit lopsided or smaller than the other, you can usually work the fabric through the center knot to even things out. It's a bit like coaxing the material into place. Take your time with this part; a few small adjustments can make a big difference in how polished your bow appears. This step is pretty much about making your how to make a bow with a bandana project look its best.
You might also want to trim the loose ends if they're too long or uneven. Just make sure you don't cut them too short, especially if you plan to tie the bow onto something. A little bit of length on the ends can add to the look, giving it a bit of a playful feel. Or, you can tuck them behind the bow if you want a cleaner, more compact appearance. It's really up to your personal preference, you know?
Once you're happy with the shape and size, give the whole bow a final gentle tug on the loose ends to make sure the knot is secure. You want it to hold its shape without coming undone. This final shaping makes your bandana bow ready to use, whether you're putting it in your hair, on a gift, or anywhere else you can think of. It's a pretty simple process, but the outcome is quite charming.
Where Can You Use Your New Bandana Bow?
So, now that you've got your very own bandana bow, what can you do with it? The possibilities are, actually, quite wide open. This little accessory is surprisingly versatile, and it can add a touch of personality to so many different things. It's pretty much a quick way to brighten something up or give it a bit of a different feel.
One of the most common places people put a bandana bow is in their hair. You can use it to tie back a ponytail, dress up a bun, or even just clip it onto a headband. It adds a nice pop of color or pattern and can really pull an outfit together. It's a simple way to change your look without a lot of fuss, you know? It's a pretty popular way to use your how to make a bow with a bandana creation.
Beyond hair, think about using your bow as an accent on bags or purses. Tie it around a handle, or clip it to a zipper pull. It's a fun way to personalize something you carry every day. It can make a plain tote bag look a little more interesting, or add a touch of whimsy to a more structured handbag. It's a small detail that can make a big impact, really.
Gift wrapping is another great spot for a bandana bow. Instead of traditional ribbon, use your handmade bow to top off a present. It's a unique and thoughtful touch that shows you put a little extra effort into the gift. Plus, the person receiving the gift gets an extra little item they can reuse! It's a pretty cool way to make a present feel more special.
You could also use these bows to decorate your home. Tie them around curtain tie-backs, or use them to adorn decorative baskets. They can add a bit of softness and color to a room. They're also great for crafting projects, like making wreaths or decorating picture frames. The versatility of your new bandana bow is, in a way, one of its best features.


Detail Author:
- Name : Prof. Randall White IV
- Username : qgleason
- Email : ralph.thompson@paucek.org
- Birthdate : 2006-10-10
- Address : 40642 Skiles Wells Marktown, AZ 69259
- Phone : +1-640-505-3877
- Company : Satterfield, Wintheiser and Thompson
- Job : Dredge Operator
- Bio : Voluptate eligendi voluptas nam voluptatum quisquam. Nostrum voluptatem sed quasi quo ut. Adipisci non nulla perspiciatis eaque eos. Voluptatem dolore nobis excepturi nulla voluptatum.
Socials
linkedin:
- url : https://linkedin.com/in/everettetillman
- username : everettetillman
- bio : Sunt rerum aperiam sunt accusantium.
- followers : 1790
- following : 99
instagram:
- url : https://instagram.com/tillman2024
- username : tillman2024
- bio : Sequi cupiditate voluptatem aliquam dolore veritatis consequatur. Eos at illo omnis impedit.
- followers : 2320
- following : 1317
